This guide to the aclpub software will help you create
a single proceedings volume for an ACL-affiliated conference.
Presumably, you are one of the following:
In short, you are a "book chair." This document will assume that you are specifically the program chair of a workshop, since most workshops are run like this.
Note: For our purposes, the student research workshop and the short paper session are considered to be separate logical books, even though they may be physically bound together (along with tutorial program info) into a single "companion volume."
We have tried to automate the process as much as possible. However, it still requires manual input. You should allocate 2-3 hours for this process. The final look of your proceedings is your responsibility!
By following these instructions, you will produce the following:
a single book.pdf file that contains your entire
proceedings volume. The volume will then be professionally printed
and also distributed as a PDF file on the conference CD-ROM. It is
meant to look good both when printed and when viewed in a browser onscreen during
the conference.
In brief, the scripts use the LaTeX pdfpages package
to combine all the papers plus front matter (title pages, tables of contents, etc.)
into a single PDF file.
Page numbers and citation/copyright information are automatically
"stamped" onto the included papers. Papers with incorrect margins are
shifted vertically at your discretion. The workshop program, the
table of contents, and the author index are produced almost
automatically and contain clickable hyperlinks for the reader's
convenience.
a spine.ps file for the binding of the printed
volume.
a cdrom directory that will be included on the
conference CD-ROM. This contains HTML web pages, modfied PDF and
PostScript versions of the individual papers, and BibTeX
bibliography entries.
a copyright-signatures file with electronic
signatures from the authors. This will be sent to the ACL main
office.
an advertisement.html webpage that you, or
the conference webmaster, can use to advertise your program in
advance.
a few auxiliary data files that will be used again by the publications chair to produce other material for the CD-ROM (e.g., a consolidated BibTeX database and a consolidated author index) and the online ACL Anthology.
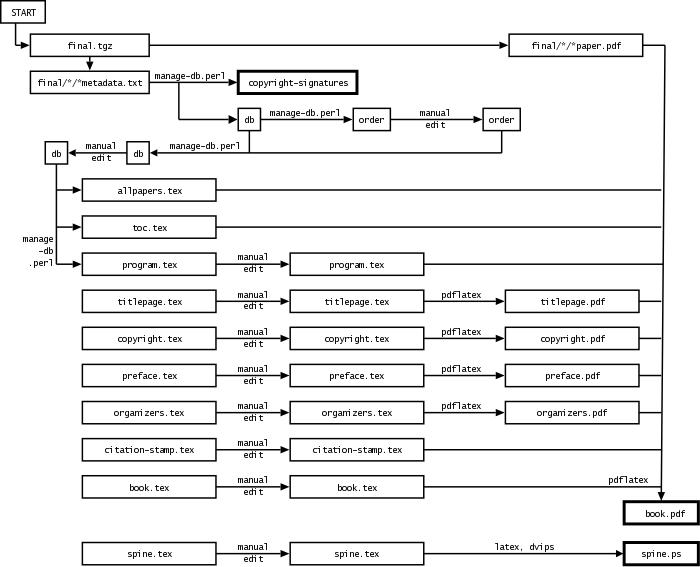
Here is a flowchart to illustrate the process. You will be using the START V2 ACLPUB Tool, which is a wrapper over the original ACLPUB scripts. The ACLPUB scripts used makefiles that followed the steps in this flowchart, and most operations had to be carried out manually.
Please note that you do not need to know about makefiles and Linux to run the proceedings generation. Almost everything is available from the various tabs of the START V2 ACLPUB tool.
If you still want to hand tune the result via the legacy ACLPUB scripts, you can download the package and install it on your machine. Then you can use the final submission zip archive file as input to the old ACLPUB scripts, and generate your proceedings. However, this method is not recommended.
If you have trouble figuring out how to use the scripts, ask the publications chair for help.
If you think there is something wrong with the scripts, or have constructive comments, email the publications chairs.
If you want to improve the scripts or documentation, you can download the ACLPUB scripts produced by START as a zip file, and send patches to the SoftConf team for integration.
Acknowledgments: The aclpub package and documentation were built in 2005 by Jason Eisner and Philipp Koehn, based in part on scripts by David Yarowsky that had been used for several years previously.
When you need to start collecting the camera-ready papers for your conference or workshop, you need to create a Custom Final Submission Page. To do that, you need to go in the Manager Console, then to the Custom Submission Page Editor.
First of all, please check that a final page for your publication does not already exist. If you are running a workshop, in fact, it may be that the Softconf people already populated an ACLPUB final submission page for you.
If a final submission page is not yet available, please create one by clicking on the New Page tab, using the "-- (ACLPUB Final Submission template) --". Please edit all the copyright information and the additional text as you wish. You may add additional textboxes, selectors, and the like to collect more information if needed.
When you are satisfied with the final submission page, you need to make it visible by activating it. To activate it, please go in the Manager Console, then Visibility/Phasing/Deadlines. Make the page the only one visible for Revision, and be sure to set a reasonable deadline for the page.
To test if the page works properly, you need to try it using the passcode of an accepted paper. To get the passcode, you can use the Spreadsheet Maker in the Manager Console.
Your first job is to check that your authors signed their copyright
forms via START. To create the copyright-signatures
file, go on the Generate tab, and click on the Copyright
Signatures button.
After pressing the button, the page will be reloaded, and you will have three links next to the button:
At this point, click on the "Download copyright signatures" link to download the copyright signatures.
DO NOT EDIT THIS FILE; it is a legal record. Please review it ASAP to make sure that appropriate signatures have been provided for all papers. Then email it to the publications chair, pointing out any papers with missing or inappropriate signatures (e.g., "Mickey Mouse"). You or the publications chair will need to extract hardcopy signatures from those papers' authors in time for their papers to be included.
If you did not use START to gather the papers, you will need to get hardcopy forms from your authors. See our copyright webpage and contact the publications chairs.
Almost all the data about the papers will be maintained in a file
called db (for "database"). The metadata file does not
need to be generated. START will generate it and use it when
needed.
Make sure to get the Page number fields
right. At present, the Page number field in a db entry
is only checked against the actual paper length. You will not get a
second warning if you don't fix it, or fix it incorrectly, or create
the db file manually without help from START.
To check the paper length, you can go into the Margins tab, and check the Page # column. If an author declared a page number different from what START can find, you will get an error message there.
Most of the times, the page number error message is due to the fact that the uploaded PDF does not have embedded fonts. If that is the case, please download the paper, print it again using a PDF printer (like Acrobat Distiller, Bullzip, or similar), check if the paper has the embedded fonts in it, and if so upload again the paper.
Please go in the Generate Tab, and click on the Draft
button. The command extracts the first two pages from each paper
and adds margin markings and generates a first rough cut of the
proceedings, book.pdf.
Use then the link Download Draft to download the Rough Cut.
The rough cut is not a full volume yet (e.g., no author index,
and only the first couple of pages of each paper will be present).
But it will reveal a number of potential problems in the automatically
produced db file or the submitted PDF files.
Flip through the rough cut. Do all the fonts in the papers display and print correctly? If not, you will need to ask the author to email you a corrected version of the PDF file.
The publications chair has probably put up a webpage with
instructions for authors, based on the version at
.../aclpub/doc/authors. Remind the author to consult
that page.
Also ask the author for the LaTeX or Word sources, so that you can produce the corrected PDF file yourself on your machine, if necessary.
There are a few common problems:The paper uses the wrong overall font. Typically, the author didn't start his or her LaTeX file with
\documentclass[11pt]{article}
\usepackage{times}
Asian fonts don't display correctly or cause the PDF viewer
to report an error. In this case, the author will need to produce a
new version of the
PDF file, with Asian fonts embedded.
As an aid to detecting papers that have not correctly embedded Asian fonts, you can use the "make cdrom" command. One aspect of this process is the production of the cdrom/ps directory. As pdf files are converted to ps format and placed in that directory, diagnostic messages regarding fonts will be generated by the pdftops command.
In particular the following warnings may appear when processing papers by authors from Japan:
Error: Unknown character collection 'Adobe-Japan1'
Error: Couldn't find a font to substitute for 'Ryumin-Light-Identity-H' ('Adobe-Japan1' character collection)
Error: Couldn't find a font to substitute for 'GothicBBB-Medium-Identity-H' ('Adobe-Japan1' character collection)
Also, the following warnings may appear when processing papers by authors from China:
Error: Unknown character collection 'Adobe-GB1'
Error: Couldn't find 'GBK-EUC-H' CMap file for 'Adobe-GB1' collection
Error: Unknown CMap 'GBK-EUC-H' for character collection 'Adobe-GB1'
Error: Unknown font tag 'F1'
A paper's individual camera-ready PDF file looks okay when
viewed alone, but when it appears as part of book.pdf,
there is too much space between the letters.
We are not sure why this occasionally happens. But we suspect that
it is a problem with embedded fonts. The solution is to recreate
the paper's PDF file with a more up-to-date version of
pdflatex.
Very occasionally, a bad paper may cause
acroread to crash. Try to isolate the bad paper by viewing
the individually submitted PDF files in the final
directory, and contact the author.
Now you will check that the information provided by authors and
inserted in the metadata file in the db are correct and
correctly formatted.
Count the papers to make sure you're not missing any (e.g., due to an author's failure to submit camera-ready copy).
For each paper in the rough cut, check that
the db information (which was supplied by the author
when submitting the camera-ready paper) really matches the
author/title on the actual camera-ready paper. If not, go in the
Margins tab, and edit the paper information using the final
submission page link.
Capitalization of authors should be as in BibTeX. Example:
Piet Q. van Oostrum, Jr.
Capitalization of titles should be exactly as in BibTeX, since these data will be used to create public BibTeX files for use by anyone.
BibTeX format is designed to provide enough information for
BibTeX to use any capitalization style as directed. The proceedings
program and table of contents will use the default BibTeX
conventions almost directly. However, the information in
your db file will also be turned into public BibTeX
entries that can be used by anyone, with any bibliographic
style.
Example:
The Good, the Bad, and the Ugly: A Mixed-Case Guide to Capitalization in {BibTeX}
Specifically:
Mixed-Case.
acl.bst), "protect" it by
surrounding at least the capital letters with curly braces:
{E}nglish, {C}homsky,
{IBM}, {CFG}s, {HMM}s (or
if you prefer, {English}, {Chomsky},
{IBM}, {CFGs}, {HMMs}).
An $O(n^2)$
    Algorithm for $n$-gram Smoothing
.
In future, correcting the bibtex capitalization should be attempted first by a script. Protected words could be found by simple corpus analysis (e.g., from the submitted papers themselves).
If you are satisfied with author and title information after making appropriate changes in the information entered for each paper, regenerate the rough cut, by again clicking on the Draft button
The top/bottom margins of the paper are very often wrong. Unfortunately we have not yet found an automatic method to fix this. However, we have made it relatively easy for you to fix manually.
The rough-cut version of book.pdf includes a margin
frame and rulers that should make it easy to detect how much each
paper must be shifted to fit. Each paper is also stamped with its
submission ID.
Look especially at page 2 of each paper. If the text doesn't fit within the frame, look at the top of the text to see how many millimeters it should be moved, and add a margin specification to the specific paper. To add the margin to a paper, go in the Margins tab, and click on the yellow box in the Margins column. The format of the line is
x-axis-movement y-axis-movement[,more-options]
Positive values move up and to the right. Negative values move
down and to the left. For example, if the top of the text is
14mm below the top of the frame, according to the ruler,
then enter the values 0 14.
0 6
0 -12
Horizontal correction is rarely needed. In an exceptional case, you may need to shrink a page or clip it against a specified bounding box or something. You can do this by appending some options that will be passed to the LaTeX includegraphics command, which slurps in the page as a graphical object:
0 6,scale=0.95
0 10,bb=0 90 612 792,clip
After entering the margin movement information, you can regenerate the rough cut (just click on the Draft button again) and check that everything is at the right place. Iterate until convergence.
In an ACL proceedings, papers should be ordered chronologically by their time in the program. This makes the proceedings volume useful at the conference itself.
To specify the order to be used, you need to go in the order tab. From that tab, you will be able to select if you want the Order tab to be automatically generated from the information contained in the Schedule Maker, or if you want to use the ACLPUB format for the order file.
Go to the Manager console, then on the Schedule Maker, and fill a schedule for your papers. The ACLPUB script will make usage of the Days, Sections, Paper, and Generic items entries.Events that do not correspond to papers: Breaks, opening remarks, invited talks, panel discussions, awards, etc. For each such event, you should add a Generic Item in the schedule. You can insert a Generic itemthe generic items by editing the XML file generated by the schedule maker and using the latest four columns. If the keynote speech appears in the schedule with a page describing the abstract of the Keynote, then you need to do the following:
- Add a separate paper to the system. You can do that from the manager console, "Make a New Submission".
- Accept the paper in order for it to appear in the schedule.
- Submit the final material for the special event, as done for regolar submissions
- Edit the schedule to place the keynote in the right place in the schedule.
The timing of breaks may be coordinated across all the workshops on a given day. This allows participants from different workshops to mingle over shared snacks. Please consult the workshops chair when deciding when to place your breaks.
Once you have edited the Schedule using the Schedule Maker, you can again click on the Draft button.
You are free to edit the information about the paper and the schedule whenever you want.
Your first step is to create a draft
orderfile from the currentdb. To do this, click on one of the two "Import" buttons in the Order tab.Here (roughly) is the start of the draft
orderfile generated for the ACL 2005 main conference:* Wednesday, June 29, 2005 + 8:45--9:00 Opening Remarks + 9:00--10:00 Invited Talk by John Doe = Session 1: Important Matters Resolved 7 10:00--10:30 # Charniak: Coarse-to-fine n-best parsing ... 20 10:00--10:30 # Liu: Log-linear Models for Word Ali... 36 10:00--10:30 # Boulis: A Quantitative Analysis of Lex... 57 10:00--10:30 # Sasaki: Question Answering as Question... 60 10:00--10:30 # Nivre: Pseudo-Projective Dependency P... 61 10:00--10:30 # Stevenson: A Semantic Approach to IE Patt... 62 10:00--10:30 # Hutchinson: Modelling the substitutability...You should manually reorder this file and insert additional information about days, sessions, and extra events. Your final
orderfile might begin like this:* Sunday, June 26, 2005 + 8:45--9:00 Opening + 9:00--10:00 Invited Talk by Justine Cassell + 10:00--10:30 Break = Session M1R: Machine Learning and Statistical Models 215 10:30--11:00 # Ando: A High-Performance Semi-Superv... 304 11:00--11:30 # Trevor: Scaling Conditional Random Fie... 382 11:30--12:00 # Smith: Logarithmic Opinion Pools for ... = Session M1M: Word Sense Disambiguation 228 10:30--11:00 # Curran: Supersense Tagging of Unknown ... 124 11:00--11:30 # Kohomban: Learning Semantic Classes for ... 240 11:30--12:00 # Dang: The Role of Semantic Roles in ... = Session M1B: Generation 245 10:30--11:00 # Di Eugenio: Aggregation improves learning:... 417 11:00--11:30 # Paiva: Empirically-based Control of N... 305 11:30--12:00 # Soricut: Towards Developing Generation ... + 12:00--1:30 Lunch = Session Session M2R: Parsing 403 1:30--2:00 # Matsuzaki: Probabilistic CFG with latent ... 177 2:00--2:30 # Miyao: Probabilistic disambiguation m... 65 2:30--3:00 # McDonald: Online Large-Margin Training o... 60 3:00--3:30 # Nivre: Pseudo-Projective Dependency P...The
orderfile can contain these kinds of lines:
Comments: Anything following
"#"on a line will be ignored by the scripts.Scheduled papers: A typical line contains a paper number followed by a timeslot. (An optional comment indicates the first author and title, for your convenience.)
Unscheduled papers: You may omit a paper's timeslot (e.g., in a poster session where the posters run in parallel). The paper ID is enough. Remember that the order of papers in the
orderfile will determine the order in the proceedings.Days: At the start of each day of the workshop (even if there is only one day), add a line beginning with
*such as:* Sunday, June 26, 2005Session titles: The workshop may be broken up into several sessions. For each session title add a line beginning with
=such as:= Session M1R: Machine Learning and Statistical ModelsEvents that do not correspond to papers: Breaks, opening remarks, invited talks, panel discussions, awards, etc. For each such event, add a line beginning with
+such as:+ 9:00--10:00 Invited Talk by Justine CassellThe timing of breaks may be coordinated across all the workshops on a given day. This allows participants from different workshops to mingle over shared snacks. Please consult the workshops chair when deciding when to place your breaks.
Once you have edited the Schedule using the Schedule Maker, you can again click on the Draft button.
You are free to edit the information about the paper and the schedule whenever you want.
Once you're satisfied with the rough cut, have a look at what the final proceedings will look like, by clicking on the Shipout button.
You can use both the Draft and the Shipout buttons as you like. When generating the files, each button works on a separate working directory, and the generations are done independently.
A number of *.tex files now have to be manually edited
for workshop-specific information.
To edit them, you have two ways: You can edit the files directly on the web page, in the Templates tab, or you can download and upload them in batch in the Downl Tmpl tab.
Edit your workshop title and date
in titlepage.tex. This will appear on the title page
and the workshop cover. You can click on the Titlepage
button on the Templates tab to see quickly what just this page will
look like.
Add the logos of your sponsors (if you have any) to the start
of the proceedings, by editing copyright.tex. You can
click on the Copyright button on the Templates tab to see
quickly what just this page will look like.
Add your preface by editing preface.tex. You can
click on the Preface button on the Templates tab to see
quickly what just this page will look like.
Add contributors' names by
editing organizers.tex. You can click on
the Organizers button on the Templates tab to see quickly
what just this page will look like.
Fix any ugly page breaks in program.tex and
toc.tex. You can edit the two files in the Program
tab. Note taht to use the modified files, you need to check the
appropriate checkbox in the Generate tab. You can click on
the Program and Toc button on the Templates tab to see
quickly what just this page will look like.
You will have noticed that citation information is stamped at
the bottom of the first page of every paper. Edit the
teinfo command in citation-stamp.tex in the Templates/Settings tab to reflect
how your workshop should properly be cited. In particular, be
sure to change the title.
Edit the PDF metadata in book.tex. (This will
appear in the PDF "Document Properties" of the online
proceedings.)
While not usually necessary, you can edit
allpapers.tex to fine-tune the treatment
of individual papers: how they are
citation-stamped, indexed in the Author Index, graphically included via includepdf,
etc.
.tex files until
everything looks good by clicking on the Shipout button.
Make sure that all names are spelled correctly, etc.
Just in case, check the following production issues:
The first paper should start on an odd page. That is,
page 1 should correspond to an odd-numbered page of the full PDF file,
so that it appears on the right side in the printed volume. (This
is supposed to be arranged automatically by isodd
macros in book.tex.)
There should be red hyperlinks in the table of contents, program, and author index, as well as "bookmarks" at the left of the PDF window. All of these should work when clicked. In future, it would be nice to have hierarchical bookmarks grouped by session.
The first page of every paper should have a citation stamped below the page number. This may occasionally be cut off (for completely bitmapped papers). Contact the publications chairs for a short-term fix. There exists a long-term fix for next year.
Try printing the PDF file on a black-and-white Postscript printer. Just because everything works onscreen does not guarantee that it will work in the printout.
Make sure everything looks fine onscreen and prints fine! Look through the online and printed proceedings carefully. It is the responsibility of the workshop chair to make sure that everything is correct.
Edit the file spine.tex in the Templates/Settings tab
to reflect the text that you want to appear on the binding of the
volume. (Note: If the volume is too thin to support spine
text, this file will be ignored.)
Now click on the Spine button in the Generate tab to chheck the result.
Now it's time to build your contribution to the CD-ROM, including HTML pages and BibTeX entries. For this, you will need to edit all the fields in the CDROM tab
Contact the publications chair for the correct value of the about the Bibtex URL field for your workshop. This determines its permament URL in the ACL Anthology.
To create the cdrom directory, click on the All button in the Generate tab.
The button also creates an advertisement webpage for your workshop (basically a
copy of cdrom/program.html that has been stripped of
actual links to the papers).
Click on the All button in the Generate tab.
This will check that everything is up to date, and package up your
proceedings directory as a tarball file
proceedings.tgz in the parent directory.
Send ../proceedings.tgz by the deadline to the
publications chair. Use an email attachment if necessary, but it
would be nicer just to email an http: or
ftp: URL where the proceedings.tgz file can
be downloaded.
While we want the whole tarball so that we can rerun the scripts in case of problems, it is especially essential that we receive:
book.pdf, the proceedingsdb, the reordered database filefinal.tgz, the PDF files of the papers and metadatacitation-stamp.tex, the template for the citation text stamped on each paper
spine.ps, the spinecopyright-signatures, the file with the copyright signaturesThat is, the best thing to send is the zip file resulted from the click on the All button.
Congratulations and thank you!